Blink 2 is a sketch that allows for 2 LEDs to blink on and off.
int ledPin = 13; // LED connected to digital pin 13
int redLedPin = 12; // LED connected to digital pin 12
int del =500;
// The setup() method runs once, when the sketch starts
void setup() {
// initialize the digital pin as an output:
pinMode(ledPin, OUTPUT);
pinMode(redLedPin, OUTPUT);
}
// the loop() method runs over and over again,
// as long as the Arduino has power
void loop()
{
digitalWrite(ledPin, HIGH); // set the LED on
digitalWrite(redLedPin, LOW); // set the LED on
delay(del); // wait for a second
digitalWrite(ledPin, LOW); // set the LED off
digitalWrite(redLedPin, HIGH); // set the LED off
delay(del); // wait for a second
}
This code flicks between the two LEDs, lighting them on and off individually.
Sunday, February 28, 2010
Day five....

Task 24 - Photocell simple testing sketch.
The LDR is a light dependent resistor. Using allows us to measure how much light is around it.
int photoCellPin = 0;
int photoCellReading;
void setup(void)
{
Serial.begin(9600);
}
void loop(void)
{
photoCellReading = analogRead(photoCellPin);
Serial.print("analog reading = ");
Serial.print(photoCellReading);
if (photoCellReading 'less than' 10)
{Serial.println(" - Very Dark");}
else
if (photoCellReading 'less than' 100)
{Serial.println(" - Dark");}
else
if (photoCellReading 'less than' 200)
{Serial.println(" - Dim");}
else
if (photoCellReading 'less than' 500)
{Serial.println(" - Light");}
else
if (photoCellReading 'less than' 600)
{Serial.println(" - Lighter");}
else
if (photoCellReading 'less than' 800)
{Serial.println(" - Bright");}
else
{Serial.println(" - Very Bright");}
delay(1000);
}
note: Blogger would not accept html symbol.
To see the full effect of this, after uploading it to the ardiuno, click on the "serial monitor" button in the sketch. At each second, it will display feedback about the light source at that time.
Thursday, February 25, 2010
Ideas for first LED project.
 http://www.instructables.com/id/Arduino-Led-Dice
Make Party LEDs Blink to your Music :
http://hacknmod.com/hack/top-10-absolutely-stunning-led-light-projects/
Model Porsche LED Computer Case Mod :
http://hacknmod.com/hack/top-10-absolutely-stunning-led-light-projects/
LED Fiber Optic Rose:
 http://hacknmod.com/hack/make-an-led-fiber-optic-rose-great-birthday-or-valentines/
Youtube Vids
There are lots of videos about the Arduino on youtube.com. There is already a link to one in my sites of interest section.
Here is a few other I found:
TBC
Here is a few other I found:
TBC
Hex and Binary
This page has a quick calculation method for converting a Hex value to a decimal and binary.
http://easycalculation.com/hex-converter.php
http://easycalculation.com/hex-converter.php
The CHIP-8 emulator.
PONG, SPACE INVADERS, PACMAN, BRIX and TANK: the ultimate retro games. The CHIP8 is a language interpreter that allows users to re-create some VERY simple retro games. CHIP-8 programs are very small, they cannot be any larger than 4Kb. This would explain the lack of "colourful imagry" in them. They consist of basic white "brick" looking shapes on a black background which visually doesnt give the user much to think about. The real appeal of these types of games would be their replayablitiy factor. Can the user play them over and over again, but still enjoy it? For their time in the 70s and 80s, yes. This was "new" tecnology and had a great appeal. Even though it looks like crap.
Links:
http://www.pong-story.com/chip8/
http://en.wikipedia.org/wiki/CHIP-8
Links:
http://www.pong-story.com/chip8/
http://en.wikipedia.org/wiki/CHIP-8
Day four...
26/02/2010
Tasks - official list.
Things I need to get done.
1) Create a blog. - done
2) Put link into moodle wiki. - done
3) Fill in the rest of your details on moodle. - done
4) Check out all the sites related to the list in the embedded systems notices blog. Write a sentence about what each one does. You don't have to be very familiar with each one. - almost done.
5) Find 4 more Arduino LED related videos in youtube, blipTv etc. Put a link and a two-sentence review about each one in your blog. Be prepared to talk about one or more of them.
6) Establish a sketch pad folder. - done.
7) Write the original blink program and save into a sketch pad folder.
8) Write a variation of the blink program that has a LED mostly off. Just winking on quickly. -done.
9) Ditto, but have the LED mostly on. - done.
10) Get the LED to blink 10ms on 10ms off. Can you see it blinking? - No, only faint flickering.
11) Check out the Blink2 program elsewhere in the embedded notices blog. Run it and paste it into your blog. The following tasks are variations of Blink2. - done.
12) Make one of the LEDs blink when the other is off. - done.
13) Get on to blink mostly on and the other is mostly off. "Mostly on" means its on all the time except for a little flash off about once a second. - done.
14) Like 13 but the LEDs are reversed. That is the one that is mostly on is now mostly off. - done.
15) no task 15?? - thats done then :P
16) Get one LED to blink twice, then the other one to blink once then repeat forever. - done.
17) Write a for-loop with counter variable i. Get one LED to blink 5 times, using the for-loop, then the other to blink once. Repeat forever. - done.
18) Like 17) but i can be any value. Try different ones. Later we can input this value from the keyboard. - done.
19) Write a program to get an LED to increase its rate of blinking from 100ms to 1 second. - done.
20) Same as 19 but this time ramp up the rate from 10ms to 1 second then back down again. -done.
21) Write a program to output one LED blinking rate at 200ms that outputs the word "Blink" to the screen each time it comes on. - done.
22) Same as 21 but this time use 2 LEDs of different colours and output the colour of the LED to the screen each time it goes on. So you should see eg "red yellow red yellow".
23) http://wwww.wikieducator.org/User:PeterB/HowManyArduinos0 put atleast one arduino variety, like Freeduino, into this wiki with a screen shot and put a link and a comment back into your blog so that it can be verified. - done
Sunday, February 21, 2010
Day three...
Mondays class 22 feb 2010
Changed and added to the blink program to make two LEDs flash. By using the multi LED, i was able to flash through the colours red, green and blue then with another LED, the colour yellow. The code for this is very repetitive and could be minimized with an array.
Changed and added to the blink program to make two LEDs flash. By using the multi LED, i was able to flash through the colours red, green and blue then with another LED, the colour yellow. The code for this is very repetitive and could be minimized with an array.
Day two...
Fridays class involved us using the Arduino for the first time.
Several little notes were discovered such as making sure that the board and serial port types are correct.
Other than making the LED bulb flash in the ground and number 13 port, we connected the Arduino board up to the "bread board" by using several wires. In the corresponding rows to the wires we used the multi light LED to make it flash several different colours. It was fiddly to get the small wires into the correct ports, so for the assignment it might be useful to look into a bigger bread board.
Sunday, February 14, 2010
The Arduino Components.
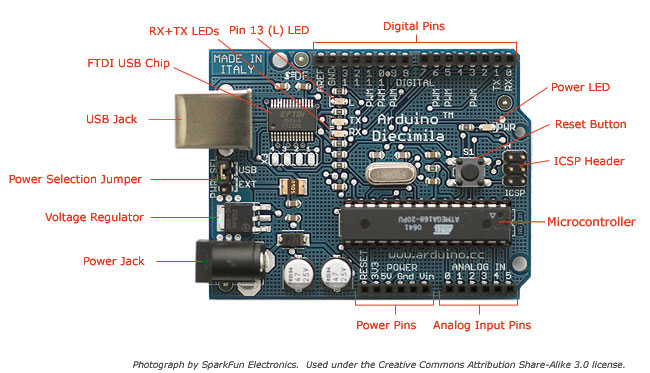
My main reason for taking this paper is because Hardware fundamentals is no longer on offer in first year and because I previously cross credited into the BIT, I need to pass Embedded Systems instead. Therefore I have little background knowledge into the physical internal components.
To help with this minor issue, I have researched into the Arduino board that we will be using to figure out what each part actually is.
Image from: http://arduino.cc/en/uploads/Guide/ArduinoDiecimilaComponents.jpg
A "Getting started" guide about the arduino duemilanove.
Research into Project 1) LED
From the youtube video shown in our first lecture (and also included in the "Sites of Interest" section), it's clear that our first project will require us to manipulate the Arduino to power a small LED (Light Emitting Diode). The following is some useful information as to how this could be performed.
The following is taken from the Arduino site (http://www.arduino.cc/en/Tutorial/BlinkingLED).
"The "Hello World!" of Physical Computing.
The first program every programmer learns consists in writing enough code to make their code show the sentence "Hello World!" on a screen.
As a microcontroller, Arduino doesn't have any pre-established output devices. Willing to provide newcomers with some help while debugging programs, we propose the use of one of the board's pins plugging a LED that we will make blink indicating the right functionallity of the program.
We have added a 1K resistor to pin 13, what allows the immediate connection of a LED between that pin and ground.
LEDs have polarity, which means they will only light up if you orient the legs properly. The long leg is typically positive, and should connect to pin 13. The short leg connects to GND; the bulb of the LED will also typically have a flat edge on this side. If the LED doesn't light up, trying reversing the legs (you won't hurt the LED if you plug it in backwards for a short period of time).
Code
The example code is very simple, credits are to be found in the comments.
/* Blinking LED
* ------------
*
* turns on and off a light emitting diode(LED) connected to a digital
* pin, in intervals of 2 seconds. Ideally we use pin 13 on the Arduino
* board because it has a resistor attached to it, needing only an LED
*
* Created 1 June 2005
* copyleft 2005 DojoDave
* http://arduino.berlios.de
*
* based on an orginal by H. Barragan for the Wiring i/o board
*/
int ledPin = 13; // LED connected to digital pin 13
void setup()
{
pinMode(ledPin, OUTPUT); // sets the digital pin as output
}
void loop()
{
digitalWrite(ledPin, HIGH); // sets the LED on
delay(1000); // waits for a second
digitalWrite(ledPin, LOW); // sets the LED off
delay(1000); // waits for a second
}
"
Day One...
Things to investigate:
- Gnu gcc
- AVR
- Youtube Arduino based projects.
- Wiki Educator
- Moodle
- Chip8
- Fritzing
- Open Office
Projects to think about or research ideas:
- A LED project due March 12th.
- Minor project on a negotiated theme due April 23rd.
- Major project for a sustainable and interesting use of the Arduino platform, due by the last class, June 18th.
Any web pages relevant to the above will be included in the "Sites of Interest" section.
Subscribe to:
Posts (Atom)